Special Edition Puffy
Pillow Tutorial
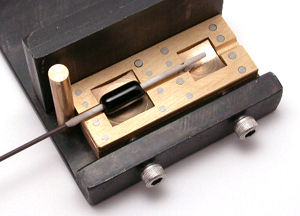
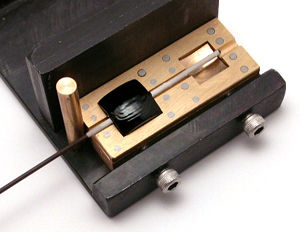
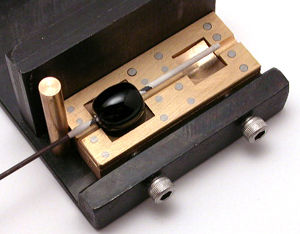
For proper alignment, make sure that your bottom tray is loaded into the
base with the X on the left side. When pressing, also make sure that the
X on the top of the tool is towards the left. |
|
Lay down your initial footprint approximately 1mm shy of the edges
of the cavity on both sides. You can check the size by either bringing
the mandrel down to the base of the
tool
for
reference,
or the
handle
portion of the tool up under your mandrel. It is better to estimate smaller
at first because you can always add more to the footprint. Once it's
on, you cannot take it off.
|
| |
|
|
If you've followed our tip about determining
how
much glass you need for the cavity, you will know about how much
glass to wind onto your mandrel..
|
| |
|
|
When you have the right amount of glass
on your mandrel, use the base of the tool as a marver to start shaping
it into a slight barrel shape. While molten enough for the glass to move,
but not too soupy, roll your gather against the bottom cavity. This may
require a few reheatings until you get the feel for the process.
|
| |
|
 |
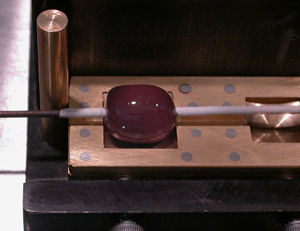
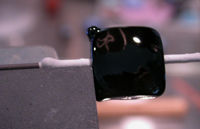
The
picture here shows the suggested shape before pressing. Your barrel should
still be about 1mm shy of the edges of the cavity, for best results.
If you have a larger shape than that, you will get an extra rim of glass
around the hole.
|
| |
|
 |
Do not press when soupy and fully molten. Wait until your glass starts
to slightly 'form a skin' (don't wait too long or you won't be able to
press). If you want real crisp edges and nice square corners, the glass
needs to be molten enough to seep into those areas.
Allow your glass to
begin to settle into the
bottom
of the
tool so
it
doesn't
slide
around
too much
when you
begin
to
press. Align your tools with the back fence of the base and the left brass
pin and press straight down. |
| |
|
| TIP: If you get the exact right amount of glass (or sometimes
a little extra) you may find that your bead sticks in the cavity. Don't
panic, but it is recommended that you keep some type of tweezers or pick
nearby so that you can help nudge the mandrel up out of the cavity if necessary.
This can happen with any of the tools that make beads with a 90 degree
corner or edge. |
| |
|
|
You will notice that after you press, the glass has spread and filled
the whole cavity and your bead is no longer 1mm smaller on each side.
This has helped to give you a nice even bead hole without any extra seeping
out. Gently polish out any chill marks, if desired.
|
| |
|
| HINTS AND TIPS FOR THIS TOOL: |
|
|
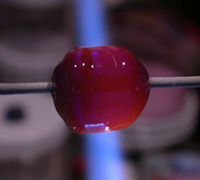
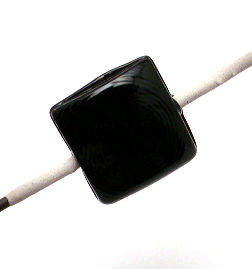
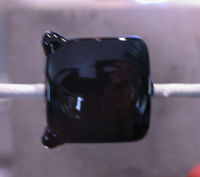
DID YOU HAVE TOO MUCH GLASS?
Can you see the extra rim of glass on
the edge of this bead? This is what happens with any tool if you have
too
much
glass
before
you press.
This is also what can happen if you use a round gather instead of a
barrel before pressing. The good news is that with this tool, you can fire polish a minimal
rim back in easily and not have to use a marver, which can distort your
bead. |
|
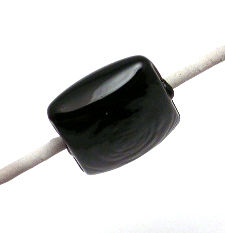
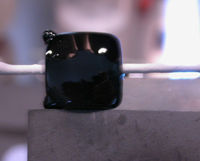
This picture shows the other side of the bead above after the
extra rim of glass was fire polished back in, solely using the flame, no
tools
to
help
the
process! |
| |
|
|
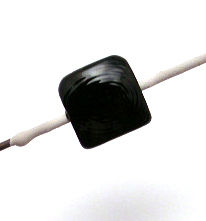
DID YOU NOT HAVE ENOUGH GLASS BEFORE YOU PRESSED?
This could be the result if you didn't have enough glass before you pressed;
rounded corners. The good news is, you can fix that without having to turn
your bead back into a barrel. It works best if you are working with a solid
colored base or can work the corners into your design. |
| |
|
|
Simply add dots of glass to the corners that are rounded. I will show
you 2 here for illustration. |
| |
|
|
Begin to spot heat your first dot and use a marver to shape the dot back
into a 90 degree angle. It works well to use a torch top marver because
it doesn't move and is always parallel and perpendicular. |
| |
|
|
Keep spot heating and going back and forth between marvering the side
and top or bottom (whichever corner you're working on). This process will
go much faster after you get the hang of it. |
| |
|
| I didn't get a good picture of this next step yet but once
you get the corners you were working on back into somewhat of a square
again, pick up enough heat in your bead to have a slight glow and let it
soften up enough so that it can fit back into the cavity and press again.
If you're a master marverer, you might not need this step. Otherwise, it
works like a charm! |
| |
|